Showing posts with label 142. Show all posts

Sunday, October 26, 2014

Down Baker Street to Moriarty's Lair

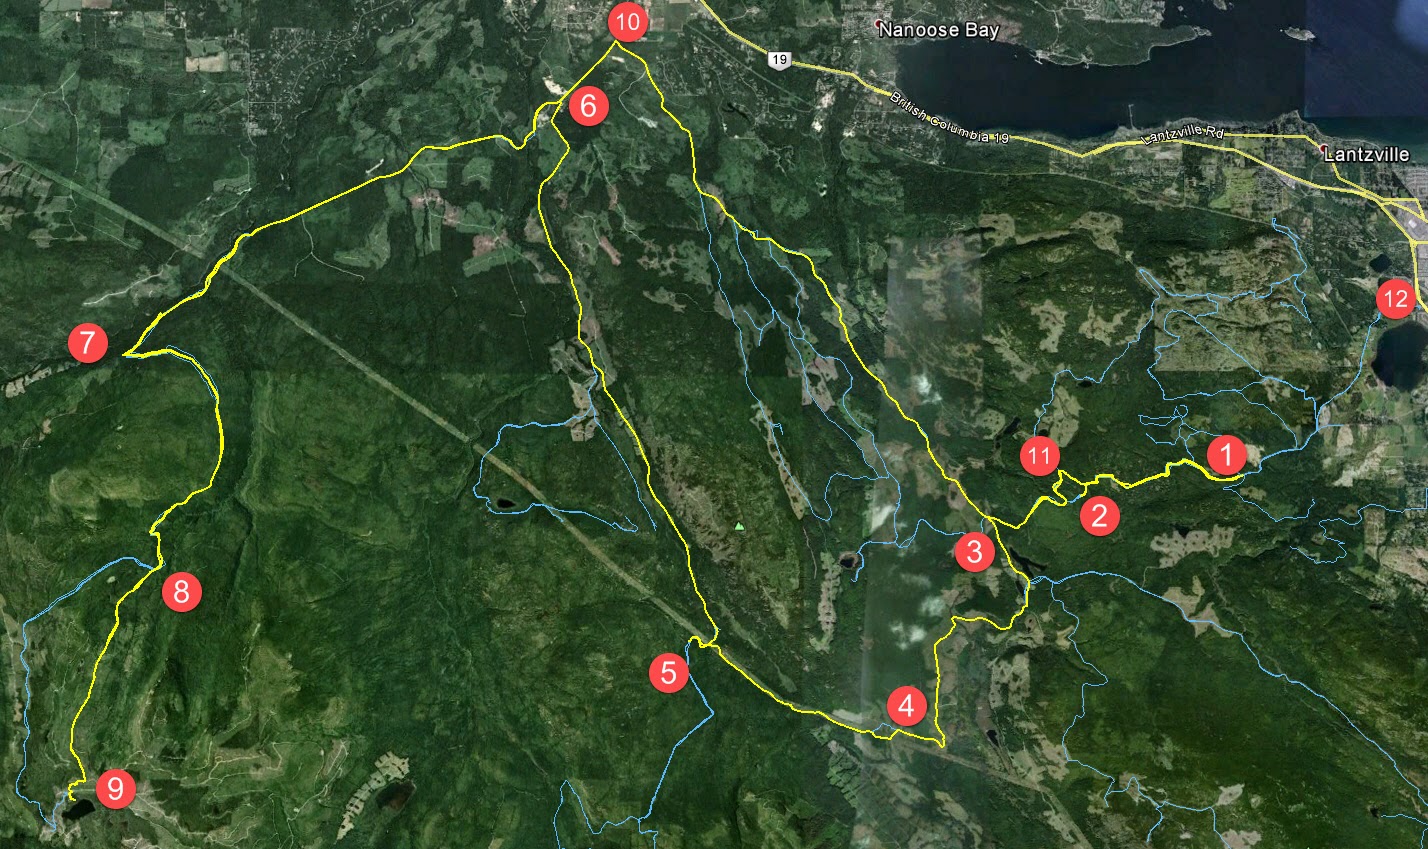
Our recent rides have been centered around using the excellent new roads created off 155 main by our friendly outdoors-sharing logging company.  Paul and I took a round-about trip out that way today to see if we could navigate our newly-discovered trail that leads to Moriarty Lake, aptly named Baker Street, without running into TimberPest's gargantuan road blockage.  We walked it during our previous ride in that area and decided that it was quite do-able if the weather remained dry.  So we picked a nice soggy Sunday with lots of running water to attempt riding it.  :)  It was a terrific ride and a great success!

Here's the shape o' the day:


1.  Entered the logging roads at Weigles Road/Doumont
2.  Turned back at the "alternative tank traps" due to wind fall tree across the trail.  We need a quader in here with a chainsaw!
3.  Through the old tank traps, which is nicely cleared, and left turn on branch 142 towards Boomerang Lake.
4.  Turned right and joined the power line trail.
5.  Intended route towards the "hellevator" trail has turned into a pretty rapidly running river.  We decided to head towards 155 main and blast up our recently more regular route.
6.  Rode up Okay Mountain Valley, past the Rhododendron turning and turned left onto 155 main.
7.  Uphill left turn onto signposted 155-160
8.  Left onto connector trail to "Baker Street" (wikilocs track)
9.  Through the connector and right down Baker Street to the logging roads surrounding Moriarty Lake.  Took a quick visit to the Moriarty cabin where Paul was kind enough to share his British Rail type sandwich.  Actually it was very good! (Yes it was - judging by the way you inhaled it! - P)  Thanks mate.
10. Retraced route towards home.  Dumped the bike up Baker Street.  Darn you Moriarty!  Followed 155 main up to a right turn onto branch 142
11.  Back through the old tank traps.
12.  Black Bear Pub for a pint o' IPA and ESB!  Cheers!

Wind Fall timber across the trail through the alternative tank traps (2 on map above)


Colour Coded Altitude Track

New burned out (stolen?) truck appears on route to the Tank Traps on the Doumont side (shortly before 2 on map)

Washed out!  River running down the route towards the HeLLeVaToR (5 on map)

Approaching Moriarty Lake Cabin on foot

Moriarty Lake Cabin at 9

Moriarty Lake Cabin at 9

Moriarty Lake Cabin at 9

Moriarty Lake Cabin at 9 Pack your garbage out...please


Above: Real Time Vid of the "Highlights" of the route to Moriarty Lake.


Time Lapse: Turning off 155-160 onto connector leading to Moriarty Lake ("Baker Street")

 Time Lapse: Back up Baker Street connector trail towards 155-160

Time Lapse: Return trip from 155

 
Track Flyover on Google Earth

GPS Track Playback at 100x Speed


Here's a direct track from doumont to Lake Moriarty.  Use it in conjunction with this track of the connector (Baker St) to get right down to the lake.  The track for the entire route, exactly as it appears on this blog page, can be found here.


Saturday, September 06, 2014

Time Lapse Vid of Doumont to Bonnell Main New Route

Ok, it took me a nearly a week to produce this video as the much vaunted free software I raved about last week (GoPro Studio) has developed a bug.  I lost the entire 3 hour production two days ago as it crashed.  Since then, and while re doing the video, it crashed every ten minutes.  I have re-installed, rebooted without success. Like me old step dad said, "you get what you pay for"...Don't forget to turn the settings up to HD.  If you don't like the music, no complaints...just mute it :)

The video references points on the map below:

The ten minute epic...

Monday, September 01, 2014

Foothills to Bonnell Main - Alternative

(Click to Enlarge)

GPX File HERE
1 Second yellow gate on right on Weigles/Dumount Road.  Easy ride around.
2 Steepish gulch, winds through trees.  Could be muddy in wet weather.  Surface is sandy duff. Ends in potentially boggy area.  Little technical, but fun.
3 Right goes to Vipond, left to some interesting trails and new access to the Bonnell Main logging road.
4 Right goes to the more traveled Foothills trails and eventually to Phantom or, if you wish, to (6) the open red gate to the Sundew Main logging roads.
5 View point spur.  Steep decline onto a vista where you can see the red gate across the valley.  Scenic. Fun to ride.
6 The popular route into the Sundew Main Logging roads.
7 Steep incline on your right.
8 Overgown lake, now a reedy bog.  Scenic, especially if you climb up the outcrop where you will see the NW Bay logging area on the other side of a small fringe of trees.
9 Descends into a single track alder trail, which may continue into the promised land...or not.
10 Access to Bonnell Main via an easy burm and small sandy single track trail through a small fringe of trees left by the logging company.
11 Bonnell Main (Goose Corner if you look at the associated photograph on GE).  From here NW Bay is your oyster.
12 Viewpoint over Nanoose Bay, Maude Island etc.  Nice small BBQ too!
13 Steep but fun ride up the "loop".
14 Red dirt descent.  Again "fun".
15 Active quarry operation.  Keep out.  Let's not vandalize here and get our access blocked please...
16 Vipond Road Gate.  Locked.  No easy work around.  A small ramp would work as the gate is low.  But why?  Head back past 15 and continue north to Phantom or Harwood Roads.
17 Rewarding connector back to gulch.  Try this on your pegs, weight forward, clutching and at jogging speed in the dry.  In the wet, make sure you have a trials tire on the back.

All in all this was a great ride!  A few B level technical trails, but nothing to stop a dirt bike and average rider.  Mostly, just great fun and as fast as you like.  Watch for other riders, keep right and stop to look at the views.

Time Lapse Video is here...see more recent post...Explanation for late arrival in detail!  (Couldn't get rid of the art below...too funny).

Paul.


Tuesday, August 12, 2014

Back to Find Mt. DeCosmos' Summit


Poor quality pano from the top...1st and 2nd Lakes 4000 odd ft below...(Click to enlarge all images)
We were up on the Mt DeCosmos roads around mid-July for the second time when we rode up the second lower summit as far as roads would take us.  Not enough--we've wanted to get right up to the summit and look over the other side at the Nanaimo Lakes for quite some time now.  So, this was today's plan:  Follow much of our July route and hike to the summit.

The route:


1.  Entered the Lantzville Foothills roads through the Harwood Drive Workaround and followed the beaten path to Bonnell Main (Sundew Main)
2.  Left turn to join the main logging roads (Bonnell)
3.  Round Lake and Kidney Lake area
4.  Left onto Branch 142 towards Boomerang Lake
5.  Right turn after Boomerang
6.  Turned right on the "Power Line Trail"
7.  Exit left towards Mt. DeCosmos (see photo directly below for additional details).
8.  Through "ThE HeLLeVaToR" trail... (bwaaaaahahahaha), then turn left on DeCosmos roads.  (Actually, the trail leading towards the "Hellevator" suits the name better.  We've tamed this hell spawn wannabe--little softy satanic trail that it is....pffff).
9.  End of second summit road.  Parked and turned left to hike up the slope to the top.
10.  Not a bad hike.  We had to stop a few times to catch our breath, but it was fairly easy going for the most part.  Bring water! 
11.  Stopped for a while at the transmitter that sits at the summit.
12.  Lots of trees to hike around to find the good viewpoints of the Nanaimo Lakes.  We found a couple of rock outcrops that get past most of the trees.  Photos below ;)
13.  Retraced our steps to the Alternate Tank Traps.  (This route has recently become usable again after two recent dig up sessions by the logging company)  Works for now, but get in quick folks, because when they find out...
14.  From Doumont to the Black Bear Pub to celebrate our victory!

Some additional details for left turn at location #7

Colour Coded Altitude Track:  Range = 103.5 m to 1331.6 m (339.6 ft to 4368.77 ft)  
Google Earth Screen Capture Showing Elevation Profile (Click for Better Detail)


Here's a GoogleEarth flyover video of the route.


Here's a "fly on the map" 100x animation of this track.  I left the GPS sitting a couple of times, so you'll have to be patient with the occasional 100x wait.  ;)


Looking Back Towards Okay Mountain from DeCosmos 2nd Summit

Transmitter

Some guy who was working on the transmitter

Looking SE towards First Lake
Clearer View:  SE Towards First Lake
Looking NE Towards the Winchelsea Island Group 
"Crash Corner" is directly above the "NE" in the above caption...Our first attempt at summiting DeCosmos left me with months of physiotherapy, and Andy with a damaged bike...You can read about that and see the route here...De Cosmos, De Crash and De Lesson...  You cannot get to this peak from the Crash Corner route (without a fair hike), but it's just possible you might be able to hike up to the "other" DeCosmos peak from the end of that road.

The Park 'N' Climb Spot...  Ready to Head Back
Shots of the riding conditions and what you can expect to encounter (surface quality and terrain) referring to numbers from the map:

Above - Between 6 and 7: The hydro-line trail was as usual dry and easy


Between 7 and 8 - Above and below - the trail connecting the hydro lines to the Hellevator can be fast and smooth, but is littered with boulders from winter runoff.  It seems longer every time we ride it!

Between 8 and 9: this gate was open in July.  The workaround is simple - the strange little gatekeeper sliding down the bank from his cave on high - directed us to the workaround (he's standing on it).  As we rode around, he slapped his leg and laughed, explaining that the joke was on us, as the gate wasn't locked!  "What's the point?!" we retorted.  He simply placed his index finger to his temple and replied cryptically that, "Tim Berwest works in mysterious ways."
Close to 9: almost there.  Look at that surface!  Dirt bike Nirvana!
8...Descending the Hellevator...You may be able to click and improve resolution, by clicking the settings button...

Track available HERE.
Fantastic ride!  If you decide to follow our track, make sure you wear a bright orange shirt so you can attract as many wasps as possible while on the summit.  This is particularly important if you want wasps to cluster around your sandwich and water bottle.  ;)

His nibs, replete in luminous orange insect attracting shirt (snicker), directing wasps, horse flies and various other biting insects to "Sit".  It must be the altitude.
EDIT:     Ah, here we are.  The proof:  "I command you to SIT!"

Monday, October 08, 2012

Deadhorse Creek Gold Mine

Holy cow... No blog updates for a while now!  This one was such a great ride it must be recorded.  Paul and I have been waiting to do this ride for quite some time.  I found reference to a gold mine for sale in the Mt. DeCosmos area towards the end of the riding season last year.  Now that we have found a tried and true route into the Nanaimo Lakes region without having to use a gate, we decided the time was finally right to go and find this mine.  Actually we attempted to get there a week earlier following trails along the north side of Decosmos from the power lines, but the trail didn't look too friendly.  We walked it and managed to reach the DeCosmos road and we quite likely could have got the bikes through the rocky trail, but we just didn't welcome the struggle.  So, on Sept 29th we made our way through the standard Moriarty Lake route using what we have come to call "the key trail."

Here's our route to #19 (the mine) and back to the starting point at Doumont Rd:


 1.  Stopped and watched some amazing young riders flying over the track at the Nanaimo Motocross Assoc. (Wastelands).  Very skillful riders on that track.  We met up with Ryan there, who was able to join us on his 450 KTM.  VERY nice bike!
2.  Through the tank traps.
3.  Left turn on Branch 142 towards Boomerang Lake.
4.  Past Boomerang Lake, turned right and then right again towards the power lines route.
5.  Headed NW along the power lines.
6.  Right turn to follow Okay Mountain Valley, (on west side of mountain).
7.  Left onto 155 main.  Got to try Ryan's KTM here... WOW!
8.  Turned left off of 155 towards mountain ridge NE of Moriarty Mountain onto 155N.
9.  Left turn towards mountain ridge.
10.  Ridge Trail NE of Mt. Moriarty
11.  Turned right onto "key trail" linking the northern logging roads to the southern roads (thanks Google E).  There's a nasty downhill section full of young alders shortly after this location.  (Might not be easily accessible if quaders don't hurry up and help us in keeping the trail usable).
12.  Down through alders.
13.  Left turn towards Healy Lake.  This was a failed attempt to get through to the DeCosmos roads by cutting past Healy Lk. 
14.  We stopped briefly at the lake to take a look:  Catch and release with non-barbed hooks here.  Daily limit=0. 
15.  Past the lake it began to get pretty steep and rocky.  Too rich for my blood!  Ryan had little trouble blasting through this section on his KTM, but Paul and I would have had much greater difficulty.  Do-able I think, but not without pushing and pulling each other.  :(  Much easier to continue through Nanaimo River Road.
16.  Back onto the main trail and downhill to Nanaimo River Road.
17.  Left turn at the beginning of Second Lake to follow the road leading up Mt. DeCosmos.
18.  Right turn onto mine trail and a sharp left again up a well grown in trail that begins to climb a bit steeper.

19.  We reached the Deadhorse Creek Gold Mine.  The narrow trail comes to an abrupt end where it meets the creek.  You can see the mine opening from here if you look slightly upwards at about 2 o'clock.  You need to climb down into the creek bed, which is about 15ft below you.  Someone has very kindly attached a couple of ropes to a tree to help you climb down about ten feet.  Once down, the entrance is clearly visible to your right and easy to reach.  (It has a flat roof, which I found a bit surprising).  We entered the mine for about 50m and encountered a vertical ventilation shaft that lets a good deal of light in.  From here there are a couple of spurs leading off in different directions.

We discovered that Paul had acquired a large metal staple in his rear tire.  It was pretty clear that a gentle ride out would be the best fix.  Excellent bit of riding on his part, not only in protecting the rim from damage, but staying upright on a tire with broken beads down a pretty bumpy trail.

20.  Luckily, the yellow gate was opened by a truck ahead of us and we escaped through without needing to retrace our route heading north.  We turned left shortly after the main gate and continued towards Doumont on logging roads once more.
21.  Continued along the SW side of Blackjack Ridge.
22.  Right towards Boomerang Lake.
23.  Thru the Tank Traps and out to Doumont to put Paul's sick bike onto Ryan's truck.  ;)

Here's some photos:

Healy Lake

Parked at Healy Lake
 
The end of the trail leading up to Deadhorse Creek.  You gotta wonder how that staple managed to get up there.  Surely nobody would be stupid enough to keep riders away from looking at a mine by puncturing their tires? 
 
Climbing down into the creek bed

Climbing down using the ropes.  You can see the entrance to the mine in this shot:  Look at the tree on the right.  Now look between the two sets of main branches on the left side of this tree.  The darker spot in the gap between is the mine opening.

You can see the mine entrance a little clearer here.  Ryan is pointing his camera directly at it.  I'm standing at the bottom of the ropes where we climbed down.


The mine entrance, (lit by daylight).  Square!?  I thought rounded would have been stronger/safer.  What do I know?
    
In the mine.  Looking back towards the entrance.

Looking up.  This is a vertical shaft about 50m into the mine.  Pretty wet here...  Lots of water dripping into the mine from this spot.  There were a couple of rotting timbers that appeared to be carrying some load at this location.  Good time to watch your step a bit more carefully.  Tons of ventilation happening... No worries about gasses, although I guess that's more of a coal mine problem.

Oh, another shot of the entrance, like it's any different when you're on the way out.

Ryan at the entrance and Paul further back making ridiculous "scary faces" with his little Walmart flashlight.

Detail view of the road past Healy Lk. where we turned back.

Detail view of the DeCosmos road that begins left, right before Second Lake.  The top shows the right turn onto the mine road and the following left turn up towards the mine.
Outstanding ride!  Highly recommended!

(Updated route to this mine with a downloadable track can be found here).

Saturday, October 08, 2011

Okay Lake/Sundew Tour

(Click Image to Enlarge)  Today's Route:  Points 1 thru 10
 
We had a really good ride today.  Paul and I met at Starbucks shortly after 8:00am and set out for Boomerang Lake via Weigles Road.  We fished for an hour or so, perhaps longer, and then decided to pack it in and go on a search for the nearby Okay Lake to continue our fishing.

Paul looking unusually happy

Willing the cast to go further by cleverly extending the left fingers in what Paul likes to call the "Gandalf Cast."  (He was actually wearing his Gryffindor hat today).

An osprey watches our fishing at Boomerang Lake

Okay Lake from the end of the trail

Loads of parking space... even a turn-around loop for trucks!

We found the lake quickly, only to discover that it's practically impossible to fish Okay Lake from the shore.  A fisherman who had also left Boomerang informed us that the rear of Okay lake is also covered in marsh land and is equally poor for shore fishing.  So we just went for a ride instead!


We retraced our steps until we reached an intersection we had passed on our way to Okay Lake and turned right onto what looked like a trail that would go around the lake.  I really enjoyed this section of our ride; the narrow trail wound up towards Okay Mountain, turned north and took us 13.5 Km. until it met up with Branch 142, a major branch of the 155 main that meets the Island Highway.

Heading up towards Okay Mountain:  A slightly upward section with a great road surface.
 
Continuing along the side of Okay Mountain

An elevation profile of the salmon coloured line starting from the large red arrow.  (The matching elevation chart below the map flows from left to right).

We decided to turn right and follow the road that leads to Sundew Gate, (at Sundew Place).  We followed Branch 142 back to "Intersection B" then through "Intersection A," and on past Round Lake to Triumph Lake.  As we continued we passed a few "controlled" slash burns on the way, and stopped to warm up at one because I'm too cheap to buy a warming vest.  (It was worth the stop even if just to hear Paul's riveting story of how a Boomerang Lake slug nearly took off with his bag of nuts.  It's stories like these that amount to folklore in his family).

Slash Burning

Further along... A bigger burn

Plenty of heat coming off these... and...

...plenty of O2 Emissions!!!
 
We continued along the Sundew Road and turned left to revisit the bivouac I had seen earlier in the week, only taking the time to continue on this spur road until it reached a dead-end.  (My riding glasses STILL mark the spot).

Bivouac Re-lived
The start of a pretty steep climb up to the dead-end
 
It's an outstanding view from up here.  That's Nanoose.
 
The ride back down
 
An approximate look at the trail past the bivouac.  (Strange glitch in my elevation chart:  We didn't actually fall 25m instantly like that).  :)   The 47.6% max. slope shown on this chart is approximately 25°.


We returned down the hill and turned left to continue once again to Sundew Gate.  Interestingly, Paul informed me that the gate had been replaced by a new gate in a slightly different location.  This answered my question about a more difficult to traverse "get-around" than Paul had photographed earlier.  The way through this new gate is indeed harder, although we made it through with little difficulty... soft sand and all.

The new gate work-around.  You follow that trench of soft sand on the left side of the photo.
The other side of the trench.  That sand is pretty soft and deep.

We ended the tour with a highway ride back to Starbucks north where we continued to stress our kidneys with yet another vat of coffee.  Terrific ride!