Showing posts with label Harwood. Show all posts

Monday, September 01, 2014

Foothills to Bonnell Main - Alternative

(Click to Enlarge)

GPX File HERE
1 Second yellow gate on right on Weigles/Dumount Road.  Easy ride around.
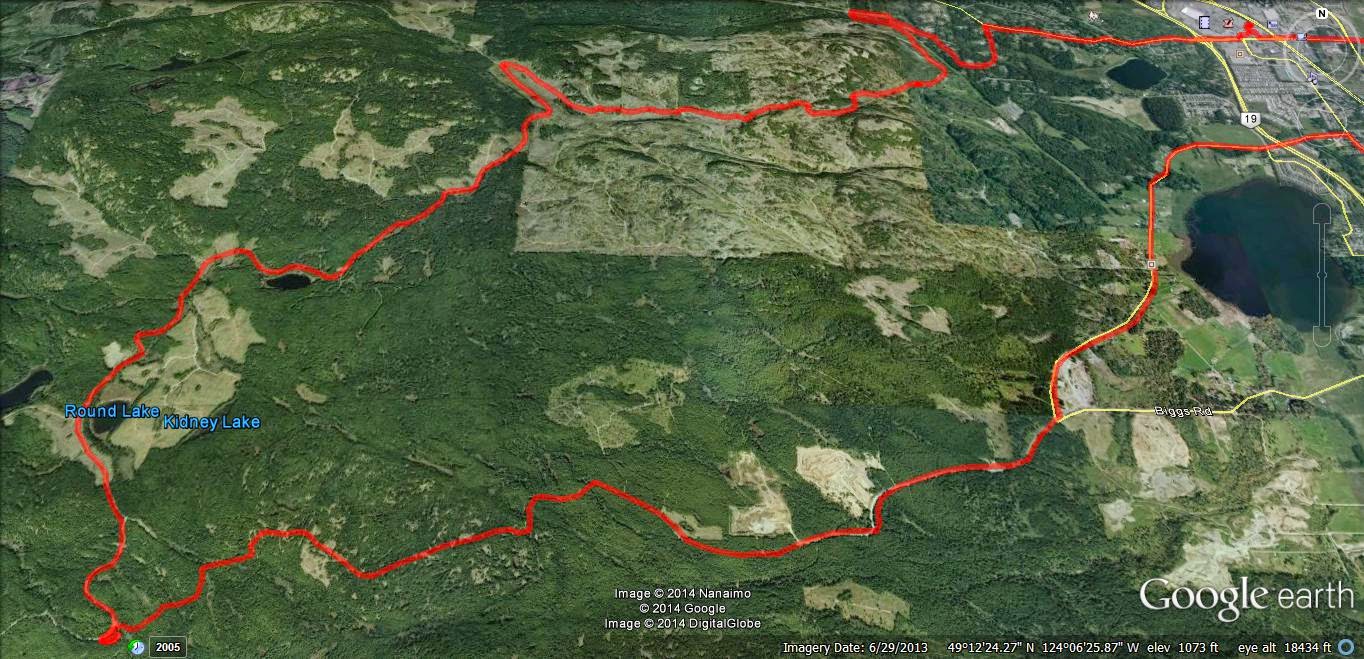
2 Steepish gulch, winds through trees.  Could be muddy in wet weather.  Surface is sandy duff. Ends in potentially boggy area.  Little technical, but fun.
3 Right goes to Vipond, left to some interesting trails and new access to the Bonnell Main logging road.
4 Right goes to the more traveled Foothills trails and eventually to Phantom or, if you wish, to (6) the open red gate to the Sundew Main logging roads.
5 View point spur.  Steep decline onto a vista where you can see the red gate across the valley.  Scenic. Fun to ride.
6 The popular route into the Sundew Main Logging roads.
7 Steep incline on your right.
8 Overgown lake, now a reedy bog.  Scenic, especially if you climb up the outcrop where you will see the NW Bay logging area on the other side of a small fringe of trees.
9 Descends into a single track alder trail, which may continue into the promised land...or not.
10 Access to Bonnell Main via an easy burm and small sandy single track trail through a small fringe of trees left by the logging company.
11 Bonnell Main (Goose Corner if you look at the associated photograph on GE).  From here NW Bay is your oyster.
12 Viewpoint over Nanoose Bay, Maude Island etc.  Nice small BBQ too!
13 Steep but fun ride up the "loop".
14 Red dirt descent.  Again "fun".
15 Active quarry operation.  Keep out.  Let's not vandalize here and get our access blocked please...
16 Vipond Road Gate.  Locked.  No easy work around.  A small ramp would work as the gate is low.  But why?  Head back past 15 and continue north to Phantom or Harwood Roads.
17 Rewarding connector back to gulch.  Try this on your pegs, weight forward, clutching and at jogging speed in the dry.  In the wet, make sure you have a trials tire on the back.

All in all this was a great ride!  A few B level technical trails, but nothing to stop a dirt bike and average rider.  Mostly, just great fun and as fast as you like.  Watch for other riders, keep right and stop to look at the views.

Time Lapse Video is here...see more recent post...Explanation for late arrival in detail!  (Couldn't get rid of the art below...too funny).

Paul.


Saturday, August 16, 2014

Go Pro Studio...Take One & Two

Usual loop, nothing new.  Phantom Road to Doumont Road via Kidney Lake...

Impressed as I am by Andy's time lapse video's via iPod App, I decided to produce a time-lapse video by stitching regular video (MP4) together and then speeding it up...  I am using a Coleman Conquest helmet cam which has the option of shooting in MP4 in HD 1080P @ 30fps and shooting continuously while saving files in 1 minute segments which fit together seamlessly when played back (it's called car mode). The advantage of this is that the files can be uploaded or edited quickly if you wish to cherry pick segments from them rather than sorting through one huge file (which you can do if you are glutton for punishment).  

So I downloaded Freemake Video and stitched 38 one minute MP4 files together, but stupidly checked the "transition" setting so they fade into each other.  I then further complicated things by downloading Go Pro Studio (Free & no malware) to take that single file and speed it up to 6 times speed.  So in all this file was converted from MP4, to as GSV file (a go pro tag), an AVI and then back to an MP4...  This may have impacted quality, so, for my second attempt, I did the same project again in Go Pro Studio only, to see if the quality is improved with as few conversions as possible.  

In Go Pro Studio you can select how many times you want to speed the video up from double speed to hundreds of times...I chose 6.  So I'm not sure how a 38 minute video was shrunk to 5m30...that's more like 7 or more times...  But it's free, and as me old (Step) dad used to say, "You get what you pay for..."

Attempt Two: Ok this was fun.  Go Pro Studio allows you to incorporate slow motion into the vid, controlling it via percentage (100% being normal speed), so I have incorporated a couple of sections of 50% and one of 25%.  Given this is a free program, I am very impressed with the flexibility and quality of the resulting product.  The downside is that it does take a long time to process the video - my 38 minute video compressed to a 7 minute video in about half an hour... 

To improve the quality, maximize the video, click settings and choose HD. Pretty darn good!  Oh, and there's a secret message at the end, but don't tell Andy.  Oh, and apologies for the music, but it is better than Andy's :)...Again - it was free...


The track for this ride can be found HERE.

[Edit, Aug 21st, Andy]
For a comparison, here's the same ride filmed in time lapse at 4x speed using an iPod and the app "TimeLapse."  The last minute is unedited.  Sorry--yes, too lazy to edit it properly. 


Riding to Kidney Lake: Some Time Lapse App Comparisons (iPod, iPhone and iPad)

So, yesterday my iPod decided that it didn't want anything to do with my time lapse movie app.  I tried everything I could think of to get them to make up and start cooperating with each other, but after completely re-conbobulating my iPod's memory and polishing it's norgon adapter plate module, the app still refused to even copy onto the device.  $4.99 down the pipe!  Time for a new app!

I downloaded five different time lapse aps from iTunes and then buckled down to begin an intense workout of filming trail rides using each one, (phffff).

Here they are... the little darlings:


1.  This was the one that I was using, "TimeLapse."  I really liked it before it decided to cause me so much grief.  It's easy to use, relatively quick when processing movies and the final product is very good.  I liked that this app allowed you to get really close to 1:1 speeds, so you could create well-detailed movies that were only slightly speeded up.  All the others do the cloud moving or flower opening thing, but this was perfect for filming rides and hikes without making them too fast.  BUT IT STOPPED WORKING ON MY IPOD!  Stupid app!

2.  "Time Lapse!"  Really liked this one when it ran on my iPad, but it also refused to even copy onto my iPod (4th gen).  What can I say...  I hate it.  It will take a frame each 1/2 second, which is pretty good for my uses, although the output movie runs a a bit too fast.  Entirely useless on my iPod though.

3.  "iLapse"  Who thought of THAT name?  It's right up there with ProLapse!  With that said, it's the best of the bunch so far.  Still only goes down to a frame every half second, which makes the final movie a bit too fast, but the interface is very friendly and intuitive. The processing, when movie crunching at the end, is a bit slow, although the quality is higher than most of the others.  I like it, but I'm still looking for one that will speed up the ride just a bit, rather than turn it into a Keystone Cops episode.  (This one is used in the example below).

4. "Timelapse Camera" is really clunky!  I must be honest, I haven't really given it much of a chance yet.  After pressing the wrong buttons fifty thousand times, I decided the design wasn't too friendly and moved on to the others.  I'll get back to you on this one after I've changed the air in my tires. [edit]  Okay, my bad...  this one is actually pretty good:  I've discovered that I can get the captures down to 1/4 second, which is the best so far.  The output can be reduced to about 15fps, giving you a finished movie that runs at around 6x speed.  That's perfect for showing rides and it's the best I've seen out of these apps so far.  I'll append an example movie from this app when I get a chance.  

5.  "Lapse It Pro"  is well promoted and I was led to believe, (like a sheep to slaughter), that this was the one for me.  Not so--the interface is friendly and it looks good, but I couldn't stop it from working like a camera program that just takes lots of pictures which it throws up on the screen to create a jumpy horror show movie.  Very jerky end product and not what I'm after.  Also, this thing makes a continuous shutter sound which I couldn't stop.  Great app if your torturing someone!

6.  "Quick Lapse HD" was fantastic for about twenty minutes, but all I get now is a black screen with a nice movie camera logo on it.  Very fancy while it lasted.  Needs to be much more robust than that.         
----------------------------------------------------------------------------

Alright, enough drivel.  Here is a time lapse movie of today's brief ride from Harwood Workaround to Kidney lake.  I used ProLapse., er... I mean iLapse:

output frame rate......... 30fps
take frame every..........  .5secs
total vid length.............  manual
total session duration...  manual

This is as slow as I can get this to run:  :(


Tuesday, August 12, 2014

Back to Find Mt. DeCosmos' Summit


Poor quality pano from the top...1st and 2nd Lakes 4000 odd ft below...(Click to enlarge all images)
We were up on the Mt DeCosmos roads around mid-July for the second time when we rode up the second lower summit as far as roads would take us.  Not enough--we've wanted to get right up to the summit and look over the other side at the Nanaimo Lakes for quite some time now.  So, this was today's plan:  Follow much of our July route and hike to the summit.

The route:


1.  Entered the Lantzville Foothills roads through the Harwood Drive Workaround and followed the beaten path to Bonnell Main (Sundew Main)
2.  Left turn to join the main logging roads (Bonnell)
3.  Round Lake and Kidney Lake area
4.  Left onto Branch 142 towards Boomerang Lake
5.  Right turn after Boomerang
6.  Turned right on the "Power Line Trail"
7.  Exit left towards Mt. DeCosmos (see photo directly below for additional details).
8.  Through "ThE HeLLeVaToR" trail... (bwaaaaahahahaha), then turn left on DeCosmos roads.  (Actually, the trail leading towards the "Hellevator" suits the name better.  We've tamed this hell spawn wannabe--little softy satanic trail that it is....pffff).
9.  End of second summit road.  Parked and turned left to hike up the slope to the top.
10.  Not a bad hike.  We had to stop a few times to catch our breath, but it was fairly easy going for the most part.  Bring water! 
11.  Stopped for a while at the transmitter that sits at the summit.
12.  Lots of trees to hike around to find the good viewpoints of the Nanaimo Lakes.  We found a couple of rock outcrops that get past most of the trees.  Photos below ;)
13.  Retraced our steps to the Alternate Tank Traps.  (This route has recently become usable again after two recent dig up sessions by the logging company)  Works for now, but get in quick folks, because when they find out...
14.  From Doumont to the Black Bear Pub to celebrate our victory!

Some additional details for left turn at location #7

Colour Coded Altitude Track:  Range = 103.5 m to 1331.6 m (339.6 ft to 4368.77 ft)  
Google Earth Screen Capture Showing Elevation Profile (Click for Better Detail)


Here's a GoogleEarth flyover video of the route.


Here's a "fly on the map" 100x animation of this track.  I left the GPS sitting a couple of times, so you'll have to be patient with the occasional 100x wait.  ;)


Looking Back Towards Okay Mountain from DeCosmos 2nd Summit

Transmitter

Some guy who was working on the transmitter

Looking SE towards First Lake
Clearer View:  SE Towards First Lake
Looking NE Towards the Winchelsea Island Group 
"Crash Corner" is directly above the "NE" in the above caption...Our first attempt at summiting DeCosmos left me with months of physiotherapy, and Andy with a damaged bike...You can read about that and see the route here...De Cosmos, De Crash and De Lesson...  You cannot get to this peak from the Crash Corner route (without a fair hike), but it's just possible you might be able to hike up to the "other" DeCosmos peak from the end of that road.

The Park 'N' Climb Spot...  Ready to Head Back
Shots of the riding conditions and what you can expect to encounter (surface quality and terrain) referring to numbers from the map:

Above - Between 6 and 7: The hydro-line trail was as usual dry and easy


Between 7 and 8 - Above and below - the trail connecting the hydro lines to the Hellevator can be fast and smooth, but is littered with boulders from winter runoff.  It seems longer every time we ride it!

Between 8 and 9: this gate was open in July.  The workaround is simple - the strange little gatekeeper sliding down the bank from his cave on high - directed us to the workaround (he's standing on it).  As we rode around, he slapped his leg and laughed, explaining that the joke was on us, as the gate wasn't locked!  "What's the point?!" we retorted.  He simply placed his index finger to his temple and replied cryptically that, "Tim Berwest works in mysterious ways."
Close to 9: almost there.  Look at that surface!  Dirt bike Nirvana!
8...Descending the Hellevator...You may be able to click and improve resolution, by clicking the settings button...

Track available HERE.
Fantastic ride!  If you decide to follow our track, make sure you wear a bright orange shirt so you can attract as many wasps as possible while on the summit.  This is particularly important if you want wasps to cluster around your sandwich and water bottle.  ;)

His nibs, replete in luminous orange insect attracting shirt (snicker), directing wasps, horse flies and various other biting insects to "Sit".  It must be the altitude.
EDIT:     Ah, here we are.  The proof:  "I command you to SIT!"

Sunday, August 10, 2014

iPod Timelapse Nonsense: Doumont, Bonnell and Harwood

As you can see from the previous five excellent posts, The REAL Motorcycle Diaries and DR Siouxsie's Travels have joined forces.  Paul and I have decided to manage this page between us and to pool our resources since we often ride together anyway.  This way, you get to read my hard-hitting, straight-to-the-point riding facts while enjoying Paul's verbose clatter sometimes in the same post!  Speaking of verbose clatter, here's a mindless post that's sure to lull any reader into a deep sleep:


I've been playing around with timelapse videos on my ipod once again.  (The resolution is crap, especially after YouTube have taken their bite out of it, but it serves its purpose quite well).  I just set my bike up with a 12v/5v accessory plug in and I wanted to get out there and give it a whirl.  So, here's a video to further illustrate my last post "Two Doumont Gates that Lead to Bonnell Main (The Sundew Road)".  This video ride was identical to the previous post, except that I exited onto Harwood Dr., instead of returning to a Doumont gate, using a short and easily navigable workaround.  (The tracks for this ride, including the workaround, can be found here).

The Route:


1.  Entered through yellow gate off of Doumont Road
2.  Over the white bridge and next left up the hill
3.  Through the "Mud Pass" into the Lantzville Foothills
4.  U-turn at Bonnell Main
5.  Left towards alternate exit
6.  Exited onto Harwood Dr. using workaround.  (Harwood Dr. is very close to Phantom Rd., giving a couple of options in this area)

Here's the workaround at #6 above.  It has been posted on here before, but with all the recent blockages by Tim Berwest, I thought it would be good to show that it's still open.  (Go on Tim--do your worst.  You know you wanna). 


Now, the video you've ALL been waiting for.... *yawn*: