One of the interesting things that all bike owners get to do is modify and customize their ride to suit themselves. I had a DR650 which I resprung, de-weighted and lowered the footpegs on (with the help of a friend who could weld). While re-springing the big Suzuki was amazing, lowering the pegs was the best and cheapest mod I did. It boosted my riding ability more than any other mod has ever done before or since. It transformed my confidence on slower more technical sections and, together with bar risers, made it much more comfortable to stand on the pegs. Of course lowering the centre of gravity didn't hurt either; in fact, it was amazing how much easier the big bike was to navigate through quite technical areas at walking speed.
The original steel pegs (ktm footpeg 590.03.041.250)
The Husaberg has much more ground clearance than the old DR, and being a very compact bike, it can be cramped in the cockpit for a 6 footer wanting to stand on the pegs for long periods of time and ride dual-sport. Not only that, but standing on the pegs gives the impression of being in helicopter. Not that the bike notices at all; it's my neurosis. So, after riding for a year, I decided, rather than buy some risers, a high bar, and re-thread all the cables and hydraulics, it would be simpler to buy some lower pegs.
.
But, on looking around there are only a few aftermarket products out there. They are slick, look nice, come in anodized blue or orange aluminum (depending on your cool-aid of choice), but they only offer a whopping 7mm of adjustment down by using a "collar". 7mm? That won't even defer the height gain from my new boots. For this you pay in $189 US before shipping, duty and taxes. Call it $250 CDN, or if you like $35 per mm.
Ouch.
So there was only one thing for it, a pegoplasty or peg-reduction if you like. The exact opposite of those pecker augmentation emails Andy keeps getting. [edit: Hey, don't knock it--those augmentation devices worked for me! ~Andy] First, I thought about making an extension bracket that would slot into the original bodywork and hang lower, but that would be very hard to stabilize as the peg is held with a large-bore clevis pin with only split-pin securing it. The pegs would waggle. Not the thing when slopping through mud or balancing on that log. Then I happened across a guy who has done the same thing on his KTM 990. Oh yeah, they use the same pegs as all the other KTM/Husa/Husky products out there - ktm footpeg 590.03.041.250. Actually it's stamped right on the peg. So I looked that up...$60 per peg. That was my insurance. I would cut the pegs themselves, get a plate welded in, and weld the peg back together. If I didn't like it, then I could always buy original (or aftermarket - $35 per mm...ouch) pegs again without having screwed up the bracket.
Despite what Andy's mum told him, that is what 1.5 inches looks like. When I got the pegs back, because of where I had directed them to cut, they had these serrations on the bracket. They would not be nice on my boots, so I ground them off.
Grinding the serrations off...Something I wouldn't have had to do if I had them cut the bracket off the peg, rather than the peg off the bracket...but what fun would that have been? Now I can look at these in the knowledge, that in some small way, I helped fabricate them...I could over time, even exaggerate and take all the credit...No, only the Welsh would stoop.
Then I sat on the bike, pondered, measured some more and fabricated some wooden "pegs" at approximately the what felt like the right height and measured. 1.5 inches lower would do it. My legs would be somewhat straighter, I would not feel like I was lurching over the bars when standing. Not only that, my centre of gravity would be lower.
Wish I could weld like that. Heck, I wish could weld!
But there are other, more serious considerations to worry about: the pegs must be no lower than the bash plate, the rear brake pedal must be able to be adjusted low enough, and the side stand must clear the port peg...I turns out that lowering the pegs by 1.5 inches is the absolute maximum that you can manage while meeting all of those criteria.
A 1.5 inch plate welded in place. Top serrations removed.
So after that long-winded ramble, here are the shots of the finished product. Thank you Nanaimo Sheet Metal - precision cut, plate inserted and, critically, welded back together at exactly the right angle (no not 90 degrees!). I furnished them with the link above and they did the rest. $100 for both. Money well spent? Only time will tell.
Grinding finished.
Above and below. Mounted on the bike.
Above and Below: brake pedal adjusted fully low with specified 5mm play.
I haven't ridden with it yet, but I am very pleased with the results so far. I'll mount my new rear (ouch that sounds awkward) and let you know how it goes... Maybe some more finagling with shifter and brake, but that can be fun too!
It's been a long time since I've been out. I usually take the time during the winter months to strip the bike down, check, service, research next year's tires (is there anything better out there for us dual sporters in the DOT domain?...yes...), purchase and checkout new equipment and watch some videos (bring yer bleach...). So with that in mind here's a mish-mash of dirtbike paraphernalia for you.
New Equipment:
I have purchased some much needed boots. After trolling all the on line reviews, vids and recommendations, it came down to Gaerne or Forma. I went with the Forma, after speaking with the guys at Atomic. I've never had a dedicated motorcycle boot before, let alone an off road enduro boot, something my riding partners chide me about. I ride in sheepskin booties with fleece lining. Soooft. Warrrrrm....Comfortable....Daaangerouus. Truthfully, on the plus side, they allow awesome control. I've never had a problem. There's absolutely no support, no protection and no waterproofness, but they are light and I can FEEL everything; consequently, the control is fabulous.
Not anymore. Now I've purchased some very highly recommended, double hinged, high-end enduro boots. The Forma Terrain. And I hate them. I'm told they are fabulous, flexible, comfortable, with top end details for a mid-range price. Am I'm sure that's all true. But they feel like flippin' ski boots. I cannot feel a damn thing. Where's the shifter? Why's the back tire screaming? Oh yeah, I've locked it up. Protection, it seems comes at a cost, and it's a trade off. I think I erred on the side of immortality versus control. Perhaps I should have gone for the Gaerne Balanced Oiled. Frankly, given a second chance, at this point, I'd drop some of the protection of the Forma for the more supple trials boot. The Forma's, to their credit, are not yet broken in, and I guess I'll give them a shot for while.
More successful were the MSR Reflex knee guards. I have an old pair of Fox knee protectors which saved my skin 18 months ago in my De Cosmos Caper Crash. However, they left me open to a second impact on my knee as they rotated as they ran down the side of Andy's bike...I spent a few months learning how to straighten my leg in physio after that. So I had been looking for a pair of knee braces or better protection. The MSR's are articulated and fit me really well, The webbing is comfortable and the protection is amazing. In short they are super comfortable, and frankly, I forget I am wearing them. Highly recommended!
Bergy Bits
It's been a little over a year since I got the Husaberg and I'm super impressed with it. The Suzuki is long forgotten. The reliability has been stellar, but even better is the performance, suspension and light weight. The bike is perfect, except for one thing...the access to those needy bits.. Getting to the valves requires removing the radiators and the fuel tank. To remove the tank, one must remove part of the subframe... You can see the Swede now, sitting with his spectacles while gazing at the CAD screen and reducing the space between components until the mass centralisation is perfect. Mechanics curse, but engineers marvel. Most of the year I marvel!
The valves are perfect and have not moved in 1500km. A new plug, chain and sprockets, and she'll be good to go, except for her rear tire, which is a Maxxis Desert IT. It's a POS in wet, rooty and or muddy conditions. It wears like steel and has the traction to match - like a puck on ice.
Tires.
On the front I have a Pirelli Scorpion XCMH which is about the pokiest DOT tire you can find. It is by far the best front DOT tire I have had for our conditions, certainly better than the D606. There are some other, newer, possibilities out there, including the Golden Tire GT series, but the early reviews are not promising with regards to wear and price per grip level. Local riders are not over impressed either, so I think I'll stick with the XMCH on the front for now.
On the rear, I've been dabbling with the idea of a Pirelli MT43 enduro trials tire. I like the idea of the awesome grip on technical trails with wet roots and rocks being easy pickings for this tire, but the cornering and its serious mud issues are a worry. The enduro-trials tire is taking off as riders discover new levels of grip in the technical trails with them. There are several new competitors for the Pirelli MT43. Enter the new Motoz Mountain Hybrid tire. If that doesn't work out (supply is limited), then I might stick a Pirelli Scorpion XMCH on the back to match the front for now.
**UPDATE: the Motoz Mountain Hybrid is hard to come by and only just available. Folks are just starting to review them as they leak slowly into North America (US only so far)... Here is a good review of the MMH being used in similar conditions to Van Isle (wetter, muddier). And here is an unflattering review of its wear characteristics when paired with a 500 in the hard rocky desert around Reno I believe...Perhaps not what it was designed for...?
It appears that Kenda are coming out with a hybrid called the Equilibrium to rival the MT43 and MMH...No reviews yet. I'll keep you posted.
Old man winter is getting closer, the sun is getting lower, and, worst of all, my insurance runs out in early December, so today Mother Nature provided us with a respite between systems and me with a bonus ride, albeit a short one. Andy was locked inside in a self-induced purgatorial work-binge and Ryan had no oil in the KTM's sightglass, Ouch. So it was a lone ride today. I like solo rides, and thought I'd stay local (Lantzville Foothills to Nanoose) and look for some new trails. Found some good'uns!
Sundew Main: having a slash when I see three dirt bikes heading north-east, way below. They take a curious trail that I've never seen before. The elevation lets my eye follow them, and I listen to the throttle blips. It sounds good. I follow.
Their tracks and lead to this gate, after passing several looking juicy looking trail junctions on the way. Curious as to where I am, I get the trusty iPhone out. Sywash Ridge Road it tells me. Never heard of it. But handy if you need another route into the foothills/Sundew main...Below, the gap is adequate...
Backtracking from the gate for 80 metres or so, and taking a partially hidden single track path to the right you hit some hydro-lines. I turned left (north-east) and came out to Lorenzen Lane in Lantzville (I know, never heard of it either, but it's off Superior Road). Could've gone right, but it had a more "civilized , dog walking look" , so I decided to leave that for another day.
Turning back, and taking some alternative routes into the woods on the west side of the hydrolines, you get into some great trails with some very tasty side routes...This is FAR steeper than it looks from the wide-angle elevation-flattening iPhone cam....
And another.
Above...Ingrid peeks over the ravine trail...You can see the memorial off to the right. Below, Ingrid-eye view from the top down. There's a slight right hand descending trail across a creek and up the other side. It's a great ride (vid at end of this drivel).
There's a little footbridge across the creek.
Footbridge with trail down from the memorial
Above: Overview of the route; Below: Close up of the Lorenzen Lane and Sywash Ridge Road access routes
Side note. I have to mention the memorial for a young man that I came across. It's a moving tribute to newly married man (August, 2011) called Garrett Paquette who passed away 6 months after his marriage, on November 11th, 2011. He left a grieving wife and an obviously loving family. If you take this route, you will see the moving memorial to Garrett. The memorial was erected for two reasons: one to remember Mr. Paquette, and to "safeguard others not to fall into the ravine below". The ravine is the one I rode down, pictured above.
The fenced entrance, maple tree, and bench serve not only as a tribute to Garret Paquette, but it was also designed to shepherd others across the ravine safely. You can see that without it, it might be tempting ride straight on towards the gently rising and curving trail on the other side of the ravine. This is what Garett did. It cost him his life.
Be safe out there. Ride on the right, and slow down. See you next season.
One of the reasons I sold the DR650 and got a Husaberg was because the Berg is light, nimble and quick, and I want to challenge myself to become a better rider and tackle more technical trails. Trials is interesting too, but doesn't quite blend with the fact I want to go distances, camp and...ahem, I like speed too. Nevertheless, some of the most satisfying rides are the ones where you tackle difficult terrain and technical trails, where slow is actually challenging and perhaps the order of the day. I find the CROSS TRAINING, ENDUROCROSS & ENDURO TECHNIQUES by the Western Australian Trials Riders to be an amazing resource. I subscribed to their monthly videos (free) and really enjoy the techniques and demos they share. They started as enduro bike riders, with Husabergs, but have since got into trials, but they still focus on enduro riding techniques which I have found that very useful lately. Riding to Moriarty lake the other day, I found myself using many of the techniques they demonstrate...whether it be riding in creek beds (watch it...excellent advice), or balancing a dirt bike.
They have a sense of humour too, which they show in this month's video installment: The David Attenboroughesque "Evolution of the trials rider".
Subscribe to them, explore their previous vids (40 or so), and you will likely start to learn some new techniques for beating those trails that, right now, look intimidating and keep you from exploring new areas.
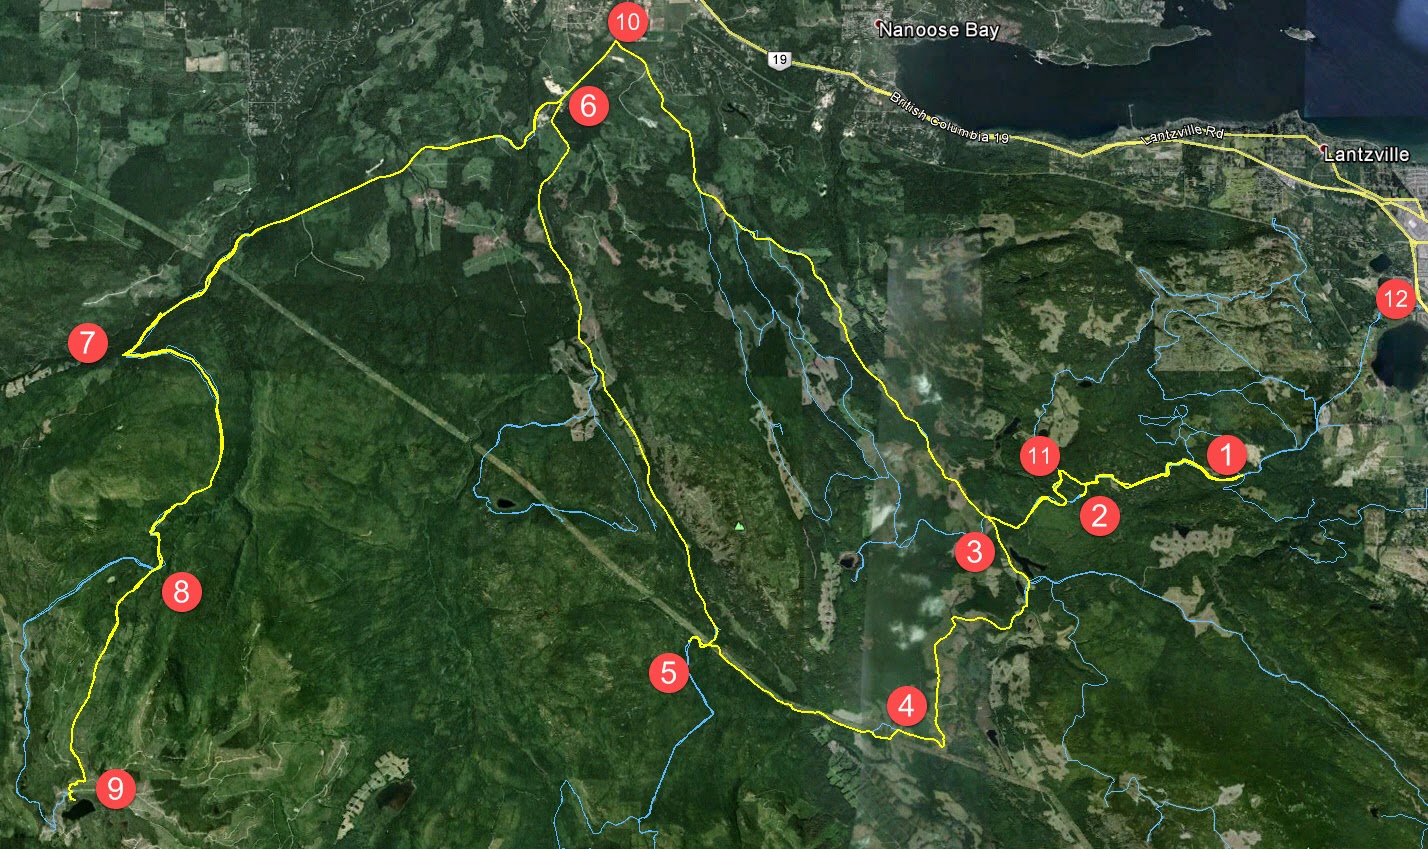
Our recent rides have been centered around using the excellent new roads created off 155 main by our friendly outdoors-sharing logging company. Paul and I took a round-about trip out that way today to see if we could navigate our newly-discovered trail that leads to Moriarty Lake, aptly named Baker Street, without running into TimberPest's gargantuan road blockage. We walked it during our previous ride in that area and decided that it was quite do-able if the weather remained dry. So we picked a nice soggy Sunday with lots of running water to attempt riding it. :) It was a terrific ride and a great success!
Here's the shape o' the day:
1. Entered the logging roads at Weigles Road/Doumont 2. Turned back at the "alternative tank traps" due to wind fall tree across the trail. We need a quader in here with a chainsaw! 3. Through the old tank traps, which is nicely cleared, and left turn on branch 142 towards Boomerang Lake. 4. Turned right and joined the power line trail. 5. Intended route towards the "hellevator" trail has turned into a pretty rapidly running river. We decided to head towards 155 main and blast up our recently more regular route. 6. Rode up Okay Mountain Valley, past the Rhododendron turning and turned left onto 155 main. 7. Uphill left turn onto signposted 155-160 8. Left onto connector trail to "Baker Street" (wikilocs track) 9. Through the connector and right down Baker Street to the logging roads surrounding Moriarty Lake. Took a quick visit to the Moriarty cabin where Paul was kind enough to share his British Rail type sandwich. Actually it was very good! (Yes it was - judging by the way you inhaled it! - P) Thanks mate. 10. Retraced route towards home. Dumped the bike up Baker Street. Darn you Moriarty! Followed 155 main up to a right turn onto branch 142 11. Back through the old tank traps. 12. Black Bear Pub for a pint o' IPA and ESB! Cheers!
Wind Fall timber across the trail through the alternative tank traps (2 on map above)
Colour Coded Altitude Track
New burned out (stolen?) truck appears on route to the Tank Traps on the Doumont side (shortly before 2 on map)
Washed out! River running down the route towards the HeLLeVaToR (5 on map)
Approaching Moriarty Lake Cabin on foot
Moriarty Lake Cabin at 9
Moriarty Lake Cabin at 9
Moriarty Lake Cabin at 9
Moriarty Lake Cabin at 9 Pack your garbage out...please
Above: Real Time Vid of the "Highlights" of the route to Moriarty Lake.
Time Lapse: Turning off 155-160 onto connector leading to Moriarty Lake ("Baker Street")
Time Lapse: Back up Baker Street connector trail towards 155-160
"Baker Street" is a way into Moriarty Lake from 155
Andy and I found a trail into Moriarty Lake from 155. "Baker Street" is perfectly doable for a bike in drier weather, and much more palatable, IMHO, than the old key trail. The blocked access to 155-160 is for reference. To get to Nanaimo Lakes Main, turn left (east) at "Moriarty's Key". ATVers that we met later told us the access route to it (green trail below) is easy. More maps and a video below.
While it looks overgrown on GE, it is not. The single track quad trail is clearly defined and obviously well used.
The unexplored green trail is accessed easily from 155-160.
The video is not very exciting, but does let you take a gander at the trail surface and terrain. It goes from "Sherlock's Trick" to "Moriarty's Key" From there, 4th Lake, "The Great Divide", Nitinat Main etc. are all accessible. Vancouver Island's backroads are your oyster...Again, apologies for the music...but it fits...;) [Apology NOT accepted ~Andy]
Google Earth flyover from 155 to the lake shore. (This is the track of the connector trail that can be downloaded right below this movie. Use it with the track "Doumont to Moriarty Lake" to find 155).
Here's a track of the connector trail which is a left turn off of 155N when heading SW, (the "unexplored green trail" shown in the photo above). The track shows the route to the lake shore, bypassing the nasty road block encountered when approaching the lake using just the major logging route.
Couldn't resist a shot of the beast. Handsome Devil, aint she!


.jpg)


.jpg)
.jpg)
.jpg)

.jpg)

.jpg)
.jpg)


.jpg)
.jpg)