Saturday, August 16, 2014

Getting to the Back of Ammonite Falls (West Upper Side)

This was intended to be an addendum to my last post where I tried out a few iPod apps that I'm using to create time lapse videos of rides.  I thought I'd begin a new post because the directions to Ammonite Falls' west side might be useful for some visitors.  In addition, I get to plaster a new blog right on top of Paul's obviously superior time lapse creation below, crushing it and rendering it completely ineffective and impotent!

Many people hike in to see Ammonite Falls from it's east side, coming from the Jameson Rd. entrance where you can park at the road's end and hoof it along the foot trails.  Another way in begins off Weigles road, through a yellow gate very close to the Wastelands MX track.  This entrance will take you to what most consider to be the back of the falls on the west side.  You arrive at the top of the falls, rather than the bottom, where the Jameson Rd. trails take you.  After a short ride from the Weigles yellow gate, you need to park and hike the last few hundred yards to the falls.  If it's wet, be warned, the top of the falls are very slippery and there's nothing but nasty pointed rocks to catch you at the bottom!

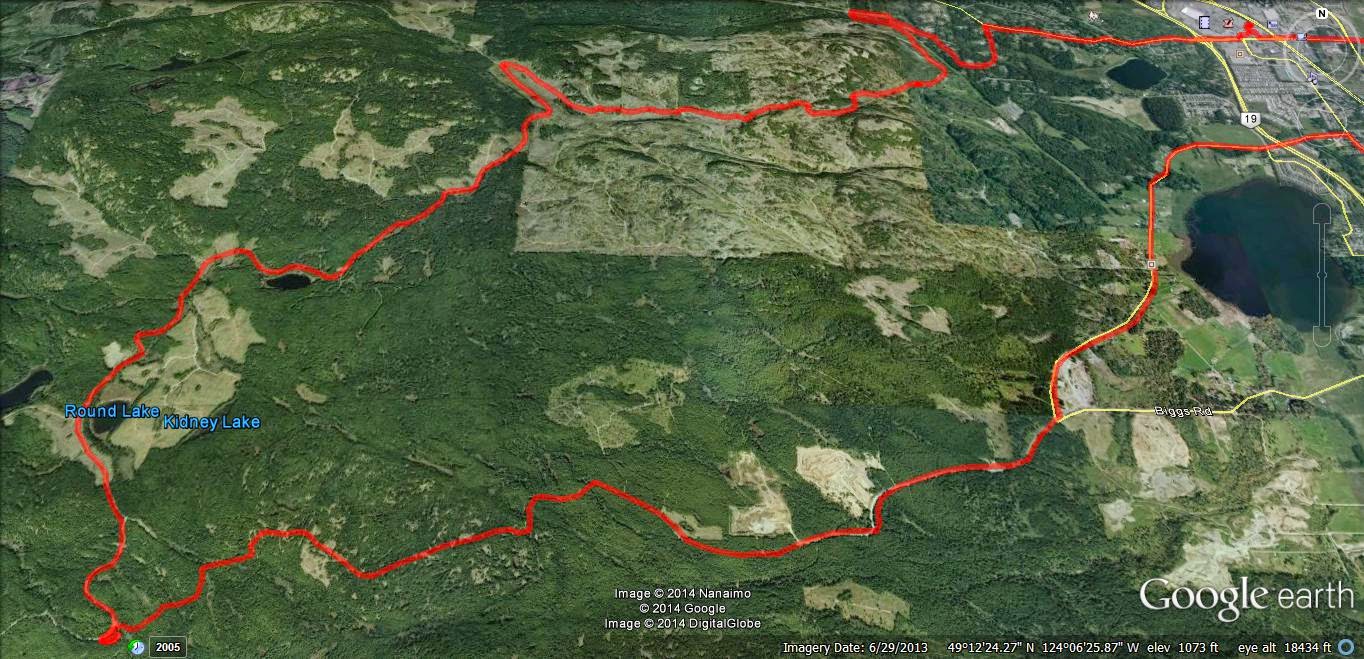
Here's the GPS track and a quick overview "flyover" movie of the route:


Now, for the time lapse video using the app "Timelapse Camera HD"


I'm not sure I'm going to find the speed and clarity I'm after at this rate.  I'm waiting for Apple to update the iOS for my iPod, (ver 7.0), in the hope that I can go back to using my original app, although it was no real winner to begin with.  Just want to get the speed down.

[Edit, Aug 20th]  I managed to get an older version of Time Lapse running on my iPod.  (That's the original app I was using that I had more success with).  This is the only one of these apps that doesn't mind running close to real-time speeds.  It will allow you to choose the playback speed as low as 1x (normal playback), 2x, 3x etc, up to the usual supersonic, flower blooming speeds that the rest of them do so well.  The results are far better when played back at 4x or 5x because you can actually follow along and see where you're going!  My "auto white balance" was playing games with me on this next video.... Some dark patches.

So, here's the vid:  Almost the same footage as before, just a bit more footage at the end.


Still a bit clunky, but not bad for an app running on iPod.

Go Pro Studio...Take One & Two

Usual loop, nothing new.  Phantom Road to Doumont Road via Kidney Lake...

Impressed as I am by Andy's time lapse video's via iPod App, I decided to produce a time-lapse video by stitching regular video (MP4) together and then speeding it up...  I am using a Coleman Conquest helmet cam which has the option of shooting in MP4 in HD 1080P @ 30fps and shooting continuously while saving files in 1 minute segments which fit together seamlessly when played back (it's called car mode). The advantage of this is that the files can be uploaded or edited quickly if you wish to cherry pick segments from them rather than sorting through one huge file (which you can do if you are glutton for punishment).  

So I downloaded Freemake Video and stitched 38 one minute MP4 files together, but stupidly checked the "transition" setting so they fade into each other.  I then further complicated things by downloading Go Pro Studio (Free & no malware) to take that single file and speed it up to 6 times speed.  So in all this file was converted from MP4, to as GSV file (a go pro tag), an AVI and then back to an MP4...  This may have impacted quality, so, for my second attempt, I did the same project again in Go Pro Studio only, to see if the quality is improved with as few conversions as possible.  

In Go Pro Studio you can select how many times you want to speed the video up from double speed to hundreds of times...I chose 6.  So I'm not sure how a 38 minute video was shrunk to 5m30...that's more like 7 or more times...  But it's free, and as me old (Step) dad used to say, "You get what you pay for..."

Attempt Two: Ok this was fun.  Go Pro Studio allows you to incorporate slow motion into the vid, controlling it via percentage (100% being normal speed), so I have incorporated a couple of sections of 50% and one of 25%.  Given this is a free program, I am very impressed with the flexibility and quality of the resulting product.  The downside is that it does take a long time to process the video - my 38 minute video compressed to a 7 minute video in about half an hour... 

To improve the quality, maximize the video, click settings and choose HD. Pretty darn good!  Oh, and there's a secret message at the end, but don't tell Andy.  Oh, and apologies for the music, but it is better than Andy's :)...Again - it was free...


The track for this ride can be found HERE.

[Edit, Aug 21st, Andy]
For a comparison, here's the same ride filmed in time lapse at 4x speed using an iPod and the app "TimeLapse."  The last minute is unedited.  Sorry--yes, too lazy to edit it properly. 


Riding to Kidney Lake: Some Time Lapse App Comparisons (iPod, iPhone and iPad)

So, yesterday my iPod decided that it didn't want anything to do with my time lapse movie app.  I tried everything I could think of to get them to make up and start cooperating with each other, but after completely re-conbobulating my iPod's memory and polishing it's norgon adapter plate module, the app still refused to even copy onto the device.  $4.99 down the pipe!  Time for a new app!

I downloaded five different time lapse aps from iTunes and then buckled down to begin an intense workout of filming trail rides using each one, (phffff).

Here they are... the little darlings:


1.  This was the one that I was using, "TimeLapse."  I really liked it before it decided to cause me so much grief.  It's easy to use, relatively quick when processing movies and the final product is very good.  I liked that this app allowed you to get really close to 1:1 speeds, so you could create well-detailed movies that were only slightly speeded up.  All the others do the cloud moving or flower opening thing, but this was perfect for filming rides and hikes without making them too fast.  BUT IT STOPPED WORKING ON MY IPOD!  Stupid app!

2.  "Time Lapse!"  Really liked this one when it ran on my iPad, but it also refused to even copy onto my iPod (4th gen).  What can I say...  I hate it.  It will take a frame each 1/2 second, which is pretty good for my uses, although the output movie runs a a bit too fast.  Entirely useless on my iPod though.

3.  "iLapse"  Who thought of THAT name?  It's right up there with ProLapse!  With that said, it's the best of the bunch so far.  Still only goes down to a frame every half second, which makes the final movie a bit too fast, but the interface is very friendly and intuitive. The processing, when movie crunching at the end, is a bit slow, although the quality is higher than most of the others.  I like it, but I'm still looking for one that will speed up the ride just a bit, rather than turn it into a Keystone Cops episode.  (This one is used in the example below).

4. "Timelapse Camera" is really clunky!  I must be honest, I haven't really given it much of a chance yet.  After pressing the wrong buttons fifty thousand times, I decided the design wasn't too friendly and moved on to the others.  I'll get back to you on this one after I've changed the air in my tires. [edit]  Okay, my bad...  this one is actually pretty good:  I've discovered that I can get the captures down to 1/4 second, which is the best so far.  The output can be reduced to about 15fps, giving you a finished movie that runs at around 6x speed.  That's perfect for showing rides and it's the best I've seen out of these apps so far.  I'll append an example movie from this app when I get a chance.  

5.  "Lapse It Pro"  is well promoted and I was led to believe, (like a sheep to slaughter), that this was the one for me.  Not so--the interface is friendly and it looks good, but I couldn't stop it from working like a camera program that just takes lots of pictures which it throws up on the screen to create a jumpy horror show movie.  Very jerky end product and not what I'm after.  Also, this thing makes a continuous shutter sound which I couldn't stop.  Great app if your torturing someone!

6.  "Quick Lapse HD" was fantastic for about twenty minutes, but all I get now is a black screen with a nice movie camera logo on it.  Very fancy while it lasted.  Needs to be much more robust than that.         
----------------------------------------------------------------------------

Alright, enough drivel.  Here is a time lapse movie of today's brief ride from Harwood Workaround to Kidney lake.  I used ProLapse., er... I mean iLapse:

output frame rate......... 30fps
take frame every..........  .5secs
total vid length.............  manual
total session duration...  manual

This is as slow as I can get this to run:  :(


Tuesday, August 12, 2014

Back to Find Mt. DeCosmos' Summit


Poor quality pano from the top...1st and 2nd Lakes 4000 odd ft below...(Click to enlarge all images)
We were up on the Mt DeCosmos roads around mid-July for the second time when we rode up the second lower summit as far as roads would take us.  Not enough--we've wanted to get right up to the summit and look over the other side at the Nanaimo Lakes for quite some time now.  So, this was today's plan:  Follow much of our July route and hike to the summit.

The route:


1.  Entered the Lantzville Foothills roads through the Harwood Drive Workaround and followed the beaten path to Bonnell Main (Sundew Main)
2.  Left turn to join the main logging roads (Bonnell)
3.  Round Lake and Kidney Lake area
4.  Left onto Branch 142 towards Boomerang Lake
5.  Right turn after Boomerang
6.  Turned right on the "Power Line Trail"
7.  Exit left towards Mt. DeCosmos (see photo directly below for additional details).
8.  Through "ThE HeLLeVaToR" trail... (bwaaaaahahahaha), then turn left on DeCosmos roads.  (Actually, the trail leading towards the "Hellevator" suits the name better.  We've tamed this hell spawn wannabe--little softy satanic trail that it is....pffff).
9.  End of second summit road.  Parked and turned left to hike up the slope to the top.
10.  Not a bad hike.  We had to stop a few times to catch our breath, but it was fairly easy going for the most part.  Bring water! 
11.  Stopped for a while at the transmitter that sits at the summit.
12.  Lots of trees to hike around to find the good viewpoints of the Nanaimo Lakes.  We found a couple of rock outcrops that get past most of the trees.  Photos below ;)
13.  Retraced our steps to the Alternate Tank Traps.  (This route has recently become usable again after two recent dig up sessions by the logging company)  Works for now, but get in quick folks, because when they find out...
14.  From Doumont to the Black Bear Pub to celebrate our victory!

Some additional details for left turn at location #7

Colour Coded Altitude Track:  Range = 103.5 m to 1331.6 m (339.6 ft to 4368.77 ft)  
Google Earth Screen Capture Showing Elevation Profile (Click for Better Detail)


Here's a GoogleEarth flyover video of the route.


Here's a "fly on the map" 100x animation of this track.  I left the GPS sitting a couple of times, so you'll have to be patient with the occasional 100x wait.  ;)


Looking Back Towards Okay Mountain from DeCosmos 2nd Summit

Transmitter

Some guy who was working on the transmitter

Looking SE towards First Lake
Clearer View:  SE Towards First Lake
Looking NE Towards the Winchelsea Island Group 
"Crash Corner" is directly above the "NE" in the above caption...Our first attempt at summiting DeCosmos left me with months of physiotherapy, and Andy with a damaged bike...You can read about that and see the route here...De Cosmos, De Crash and De Lesson...  You cannot get to this peak from the Crash Corner route (without a fair hike), but it's just possible you might be able to hike up to the "other" DeCosmos peak from the end of that road.

The Park 'N' Climb Spot...  Ready to Head Back
Shots of the riding conditions and what you can expect to encounter (surface quality and terrain) referring to numbers from the map:

Above - Between 6 and 7: The hydro-line trail was as usual dry and easy


Between 7 and 8 - Above and below - the trail connecting the hydro lines to the Hellevator can be fast and smooth, but is littered with boulders from winter runoff.  It seems longer every time we ride it!

Between 8 and 9: this gate was open in July.  The workaround is simple - the strange little gatekeeper sliding down the bank from his cave on high - directed us to the workaround (he's standing on it).  As we rode around, he slapped his leg and laughed, explaining that the joke was on us, as the gate wasn't locked!  "What's the point?!" we retorted.  He simply placed his index finger to his temple and replied cryptically that, "Tim Berwest works in mysterious ways."
Close to 9: almost there.  Look at that surface!  Dirt bike Nirvana!
8...Descending the Hellevator...You may be able to click and improve resolution, by clicking the settings button...

Track available HERE.
Fantastic ride!  If you decide to follow our track, make sure you wear a bright orange shirt so you can attract as many wasps as possible while on the summit.  This is particularly important if you want wasps to cluster around your sandwich and water bottle.  ;)

His nibs, replete in luminous orange insect attracting shirt (snicker), directing wasps, horse flies and various other biting insects to "Sit".  It must be the altitude.
EDIT:     Ah, here we are.  The proof:  "I command you to SIT!"

Sunday, August 10, 2014

iPod Timelapse Nonsense: Doumont, Bonnell and Harwood

As you can see from the previous five excellent posts, The REAL Motorcycle Diaries and DR Siouxsie's Travels have joined forces.  Paul and I have decided to manage this page between us and to pool our resources since we often ride together anyway.  This way, you get to read my hard-hitting, straight-to-the-point riding facts while enjoying Paul's verbose clatter sometimes in the same post!  Speaking of verbose clatter, here's a mindless post that's sure to lull any reader into a deep sleep:


I've been playing around with timelapse videos on my ipod once again.  (The resolution is crap, especially after YouTube have taken their bite out of it, but it serves its purpose quite well).  I just set my bike up with a 12v/5v accessory plug in and I wanted to get out there and give it a whirl.  So, here's a video to further illustrate my last post "Two Doumont Gates that Lead to Bonnell Main (The Sundew Road)".  This video ride was identical to the previous post, except that I exited onto Harwood Dr., instead of returning to a Doumont gate, using a short and easily navigable workaround.  (The tracks for this ride, including the workaround, can be found here).

The Route:


1.  Entered through yellow gate off of Doumont Road
2.  Over the white bridge and next left up the hill
3.  Through the "Mud Pass" into the Lantzville Foothills
4.  U-turn at Bonnell Main
5.  Left towards alternate exit
6.  Exited onto Harwood Dr. using workaround.  (Harwood Dr. is very close to Phantom Rd., giving a couple of options in this area)

Here's the workaround at #6 above.  It has been posted on here before, but with all the recent blockages by Tim Berwest, I thought it would be good to show that it's still open.  (Go on Tim--do your worst.  You know you wanna). 


Now, the video you've ALL been waiting for.... *yawn*:


Thursday, August 07, 2014

The BC-Washington Loop: Phase 4: Omak to Oak Harbor - Washington Pass

Click to enlarge...

1 Grand Coulee: Dam! That was a great ride down from Omak.  The dam itself is the most powerful generating facility in North America.  Pictures don't do it justice.  With names like Electric City and Elmer the local communities are small and pin their hopes on tourism and agriculture.  The peaches, cherries and apricots are fine - sweet and cheap.  Great breaky.


2, 3 and 4 Grand Coulee to Pateros: Fire and Water.  This was probably the most isolated road I have ever driven on.  As usual in Washington, with incredibly light use, the surface was immaculate. The road starts curving through some amazing terrain, and ends being like a dead straight ribbon which undulates over light rolling desert hills.  You might see a coyote, a vulture or a dust devil, but you likely won't see another vehicle.  In our case, we saw one: it was a huge camper I could see heading north miles ahead of us.  It took a while to catch him because like us, he realised that speed enforcement was not ever going to be an issue on this road.
  
Great scenic curves leaving Coulee City.

Wind up your Hyabusa here.  Look at the surface and no smoky bear anywhere in sight.
4 Pateros: Back on the SR20. The forest fires you heard about in Washington state, well Pateros was ground zero.  We stopped, but with the American Red Cross, exhausted looking fire fighters, and destitute families pulling burned wreckage out of what remained of their homes or melted trucks, taking pictures seemed crass.  There were hand painted signs everwhere thanking the firefighters for their gallant effort at saving their towns.  Leaving Pateros, ironically, we encountered the biggest thunderstorm I have ever had the "pleasure" to ride though.  This was the same one that hit BC some hours later that day (forcing the evacuation of our daughter from her camp in Enderby later that night).  The drops were huge - it was a deluge, and just what the forest fire needed to control it.  The rain, hail and lightening just added to the surreal sight of smouldering desert: we got soaked and could have been forgiven for thinking we had crashed and gone to hell, such was the wasteland and carnage we passed.  Riding through it, you would see a completely burned landscape, with the occasional house, green lawn and perfect fruit trees, the fire having burned a perfect rectangular perimeter around it...Wild.
 
Before the deluge.  Notice the blackened desert on the right.  This went on and got worse for hours....
The the rain hit...
It kept coming...surreal with the scorched earth...
 5 Twisp: The rain was so bad, we tried stopping at several small communities, but with power poles incinerated there was no power, and everything was closed, with residents forced to leave for food, shelter etc.  We saw no one in these towns.  Finally, one small store in a place called Twisp was open.  The County Sheriff and town police officer had made it their HQ, as it was the only place with a generator (and doughnuts).  For us it was a chance to stop, eat (we hadn't eaten since a few pieces of fruit in the morning which seemed like a different era...90F and sunshine, reduced to 60F, heated vest and a deluge...)  We grabbed a bowl of soup each and hung our jackets up.  When we left, we felt guilty about the lake of water we left under and around our table!
It seemed like the whole of Twisp was gathered in the General Store and Pharmacy.
6 Washington Pass.  SR20 is an amazing road, but the crown in the jewel is from Winthrop up and over Washington Pass and down to Diablo Lake.   Thunder, lightning, rain, snow, hail and gusts of wind hitting 50mph couldn't take away from the views.  Topping out at 5000 feet, the pass is guarded by Silverstar Mountain and the most amazing glacial valley.  The road is amazing and speeds of 85mph are easy up until the hairpin switchback section just west of Silverstar mountain where you should take the signage seriously.  Then its down down down all the way to Diablo Lake - aptly named, as, just as the signs warn, this area is famous for devilishly extreme side and head gusts.  Well with a thunderstorm passing over us, we got the full meal deal.  The lake itself reminds me of Payto lake near Banff = it's glacial blue and set among some gorgeous mountains with treed islands. Got to say, the Strom took it all in her stride and tracked really well particularly the winds.  Again the trail wings were amazing in the soaking conditions - there was no aquaplaning, those big sipes cleared water well.  

Washington Pass may only be half the height of Tioga Pass in Yosemite, but it's every bit as impressive...You ride up that ribbon on the left.
     
Yes, that's snow to the right of the road...
Snow...Those hand guards are worth their weight in the rain and cold wind.  The adjustable Madstad screen is worth the money over the stock crap.
Diablo Lake.  I won't wax lyrical - the picture speaks volumes. This is where the rain stopped and the wind started.

From here it was back to more familiar terrain, through Sedro-Wolley (hey, I don't name them) and through to Oak Harbor and my in-laws place to dry the gear out and change the oil.  Why not, Mobil 1 4T is 8.97L down there!  We took a side trip the next day to Hurricane Ridge via the Coupeville to Port Townsend Ferry and up to Port Angelis.  It was impressive, and Hurricane Ridge was spectacular.  But that's for another day... 

Getting back to the island from Oak Harbor is easy.  Take the Anacortes - Sidney ferry for an incredibly scenic (cheap) 2 hour trip through the San Juan's, Souther Gulf Islands.  You ride on and off first (no booking needed for bikes).  The customs are quick in Sidney - 30 seconds for us.  It certainly beats riding up to the Peace Arch, waiting in that lineup, catching the Tsawassen Ferry and paying over the odds for the "pleasure..."  We had a great ride back up the island to Nanaimo.  2100km all told.   

Would I do this trip again?  Yes.  I wouldn't change the bike, the packing or the company!  I would change the daily destinations though, as mentioned, and there would be  few places I'd skip altogether - Whistler, Vernon, Nelson to name three.  I'd also take more time to visit places like Winthrop and spend longer in each location.  It was a bit of a whirlwind, but it left a great flavour in our mouths.  

Tuesday, August 05, 2014

The BC - Washington Loop: Phase Three: Nelson to Omak - Scenic Route 20

Click to enlarge
OK, might as well come clean.  You'll notice two routes, one red, and one green.  The green was the route we had planned to take. The red was the route I mistakenly took, despite clearly seeing a sign showing me the border was imminent, and my iPhone screaming at me to turn left...I veered right.  As it turned out, it was great.  We met the Columbia River for the first time this trip.  I've crossed the mighty Columbia at its estuary in Astoria, Oregon, but I have never seen the headwaters.  Trail was a really interesting ride, and Rossland, wow, what a climb on an excellent twisty four lane highway with a ridiculous speed limit.  Needless to say, I decided to ride it as if it was in miles per hour rather than kmh in order to pratice for the upcoming border crossing...

1 Paterson Boarder Crossing: Well that was easy.  Basically from Rossland (very cute) you are descending a 7% grade for many clicks...  You think this is great and blast along, with no other cars.  A few questions pop into your head and one of them is, "Why is this road so deserted?   It's an excellent road!"  You see a large semi in front, and pull over the double yellows, down hill to pass the truck (which is hauling).  As you sweep around the subsequent bend, your question is answered.  This is the only road out of Rossland south, with no turn offs and that, right ahead, is the Paterson US Border station.   And they're watching you overtake this truck at twice the legal limit.  Welcome to the US, son.  Is that a graduated slow down series of 70, 50, 30 kmh signs you've just blown through?  The truck, it appears is just as surprised at the abrupt border station, and has to pull into the oncoming lane as his brakes are overheated from the 10km of down hill grades and he's not sure he can stop before he smears you into the border guard's bollocks.  But the American border guard is standing outside his booth, facing you with one hand on his hip and one palm up, legs apart, daring you and the truck to nudge his tackle.  Prepared for the worst, he directed us to remove our helmets.  Thank Christ my wife has a nice smile.  He held out his hand for our passports and directed his attention to what he referred to as "my little cookie on the back".  Works for me.  We were waved through in less time than it took to slap our helmets back over our chops and in the land of the free, home of the brave, and more importantly, cheap goods and services.  

2 China Bend: There's no reason to stop here, except to change your bike's computer to MPH and MPG (imperial or US).  But the Columbia takes a significant turn here, and there is a rest area.  We decided to walk out on the huge metal dock next to the boat launch.  The signs warn you not eat more than one each kind of fish you catch here per month as the river is contaminated with heavy metals: copper, mercury etc...  I thought back to the smelter right on the river in the middle of Trail.  No wonder the Americans think we're cheese-heads.  Why would you continue to run a smelter mill adjacent to a river that serves as drinking water for hundreds of thousands?  Who would build a mill in down-town Port Alberni?...But I digress.  
As we walked back to the bike, that same Beemer rider we had seen in Nakusp whisked by with a wave.   It must have been the air.  Did he know we were only riding a Vstrom?...A 73mpg (imperial) Vstrom that is...
3 Kettle Falls: Whisking along the Columbia for a few miles you get to the small community of Kettle Falls.  Gas - yes.  Cafe - yes.  Cheap, hell yes!  Big bowl of soup, large fully loaded sandwich, served with coffee, apple pie and a smile.  $4.99.  Plan to eat here. 


As you see, the rain gear is going on.  Too bad we were about to hit one of the big reasons for the whole trip: SR20

4 SR20: It stretches east to west right across Washington State.  It is an amazing road - very light traffic, with large sections closed in the Winter due to its altitude and the snow cover.  Mostly it is two lane, extremely scenic, curvy, with elevation changes and, remarkably, excellent surfacing.  In fact, I have to hand it to the Washingtonians, they know how to pave and engineer their roads.  This one is exceptional - banked and smooth.  And the signage is amazing.  In Canada, we post things seventeen times, caution riders/drivers up the ying-yang, and post yellow signs that seem geared to myopic octogenarians with palsy driving a Model T in a tempest.  The contrast, on this road, at least, was refreshing.  There's a sign.  It tells you there is a sharp left or right hand corner ahead.  Not miles ahead, but now.  It suggests a speed limit, and you quickly learn that unlike in Canada, you don't triple it, but double it.  It's almost as if they realise you're going to push your limits on this road. Unless it rains.  
5 Sherman Pass:  The rain passed, and by the time we reached Sherman Pass, it was drying nicely.  I was surprised that we were basically at the same height as Mount Arrowsmith back on the Island.  There was no hint in the bike's performance or the air temperature, perhaps because we were approaching desert...
Ignore the date and time...it's wrong... We chatted with this guy for a while about the local conditions and the forest fires we had been hearing about.  He was not going through to Twisp, saying he would stop at Republic.  Gassing up in Republic later, I couldn't see the draw, except for the 3 gas stations.
6 Wauconda: We didn't stop. Heck we didn't even notice it really.  But it has the curious reputation of being one of the few towns actually sold on Ebay.  Sorry no pic...it shot by quicker than Spuzzum going over Niagara Falls.

7 And just like that, you fall into desert heat.  The temperature rocketed from 70 ish to, well, very hot.
Wow it looks like the Cache Creek, Lillooet area, only the road surface is perfect.
8 Tonasket and the Bean Trees.  I started to wonder if everyone was called Jack around here.  The trees are curious - I've never seen them before - large leaves with what look like very long runner beans hanging down.  I'm told they not edible.  Right though to Grand Coullee, they are everywhere: a desert-tolerant deciduous perhaps.  Anyway, it was late afternoon and time for a coffee and apple pie.  


9 Desert...hot...: The scale of this land stood out.  We ran beside sage brush covered ridge for a while, with oasis like green patches snaking beside some unknown river off to our left. Pictures don't do this landscape justice - it's too big, too grand to be caught and adequately rendered by a micro-lensed camera.

 Desert Sampler...Between Tonasket and Omak

10 Omak: If there's a recurring theme of this ride, it's that we would have rather stopped somewhere else.  The Royal Motel was excellent - very good value, spic and span, a real mom and pop operation with nice touches and excellent value $49 a night...try that in Canada (no don't - you'll likely wake up with bed bug bites and the clap).  The Mexican restaurant was the best we've eaten at bar none (and I include San Diego venues, Mexican venues etc...): Rancho Chico.  Wow.  The food was excellent, no dross, real Mexicans, serving real Mexican cooking.  High quality ingredients with a smile.  Again the price was out of this world...The same meal at Gina's would have been three times the cost, and half the quality.  But the town itself is fairly devoid of any aesthetic or cultural attractions.  Now Winthrop.  That's a town!


Track available here

Sunday, August 03, 2014

The BC - Washington Loop - Phase Two: Vernon to Nelson - Lake Country

(Click for a larger image)
1 Monashee Pass (3953ft): The #6 is amazing riding here.  According to Destination Highways, this is #2 in the province: DH2.  You will likely not see another vehicle for much of this road, but if it is a silver Mercedes GLK get his number.  The man's a nutter...more on that later.  This road winds up initially through very Vancouver Island-like scenery.  The road surface too, is similar, in that it is crap in places.  But that aside, it's easy to whisk along here keeping your eyes on the road surface and scouting for deer and moose too, but heed the yellow signs and add 20kmh to the limits and you'll be cruising. Unfortunately for us, but fortunately for any future bikers here, the best part of the road (the eastern slopes after the summit) are presently being resurfaced.  The ride down from the summit is a delicious blend of grade, curves, s-bends, bridges and views, with a soon to be fabulous surface, to boot.  Pity the Province can't find it in them to pave the Alberni to Tofino road on the island the same way (NDP Riding?).  Parts of this road are very similar.


(Roadworks! With warning signs for miles before you actually hit them...what a travesty!)

2 and 3 - Needles Ferry to Fauquier (Cable Ferry):  Denman Islanders don't want a cable ferry, but from what I could see, Arrow Lake can pipe up, white caps etc, and the ferry was unbelievably smooth and fast.  Best of all though, it was free.  It must be a Liberal riding. Motorcycles, the many signs state, don't get preferential boarding on these ferries, hence the man in the Merc desperately trying to repeatedly cut me off and pass me on insane corners on the Monashee Pass road.  Eventually I acquiesced and he sped off at 150kmh or so.  We met him again, on the ferry  lineup - two cars ahead, chuckle...The half capacity "vogage" is 10 minutes or so, and the staff are friendly. The locals use these ferries like roads and expect it to be free and regular.  And they are- every half hour. Wow.  BC Ferries - anyone listening?


Above, approaching Fauquier - which coincidentally echo our feelings towards the Merc driver...

Above: One of the ferries two guide cables which is picked up from the lake bed and dropped back there afterwards.
The lake is a similar size to Baynes Sound near Denman Island.

Preferential treatment to motorcyclists - first off, not an official policy but this guy was great, much to Mr Mercedes' chagrin.  After us, he was the second vehicle, but the first Fauquier, off.
3 to 4 - Fauquier to Nakusp: Every tenth power pole seems to have a large Osprey nest perched on it.  This road runs on the east side of Arrow Lake and dishes up more gentle curves and elevation changes with the views.  Traffic is light and the surface is good. 


Above: Info stop about the Ospreys...

Breakfast after a few hours riding.  Typical lone Beemer rider didn't deign to converse with us mere mortals on a Suzuki.  Funny, we saw him later in the States and he waved, perhaps the boxer was blurring his vision and he thought we were on a GS650? 
Nakusp is a beautiful little town, well cared for and upbeat.  
A short vid of part of the ride from Needles to Nakusp...I know it was double yellow lines -I'm not blind, but it was VW Bus for Christ's Sake! The video camera is very wide angle, so curves are straightened, hills are flattened etc.  Judge a corner by the lean...

5 New Denver: - This is the start of one of the best rides in BC, but before that, some food.

Above and Below: the Nikkei Centre - well worth the visit.  This is where some of the Japanese-Canadians were interned during WW2.  It's fairly shocking when you see the conditions and documentation conferring them little more than animal like status.

6 Sandon: A side trip to an ex silver mining ghost town with trolley buses, trains, and a dirt road...It's a few clicks down a dirt road, but even 2 up, the VStrom was great.  


6 to 8: New Denver to Kaslo - the best road I've ridden in BC (DH5?!). DH1 is said to be the Whistler to Lillooet road.  Nope.  This IS it.  It is mind blowing.  Curve after curve after vista after curve, you can see why this is closed periodically in Winter.  And with New Denver at one end and Kaslo at the other, this is motorcycling nirvana.  Hyperbole?  Not a bit.  Ride it. You'll see. Pics and Vid below.  The vid is 8 minutes long.  I cut a lot out...  Traffic is light, the road surface is pretty good.  


Above and below: It is very hard to stop on this road.  It is one of those roads that just gets you into a comfortable rhythm and you get faster and faster.  It feels like you've ridden it before, you know the type.  But with vistas like this you have to stop and look...That's oil.  I assume a Harley was parked in the same spot some moments earlier?


Above the SS Mylo - get in, look around.  Parked on Kootenay Lake.  Below: Kaslo is full of bikes.  Wonder why?!  Below: Great cafe's and people to chat to.  One guy turned up in a Honda NightHawk 27 years old, with collector plates and it looked new. Great compact little bike.  He's a local, and the Kaslo New Denver jaunt is a weekly event for him.  Lucky bugger. 

Ahh, the ride...Told you...
Caveate...The video camera is very wide angle, so curves are straightened, hills are flattened etc.  Judge a corner by the lean...

9 Nelson.  What can I say? I was disappointed.  So many people had told me how "beautiful" this town was that when we got there, it just didn't hold a candle to our expectations.  New Denver, Kaslo, Nakusp...they were beautiful.  Nelson...nice setting, great weather, lovely lake, grand view from the bridge on the way in.  Worth seeing, but hopefully I brought your expectations down so you'll appreciate it more?!

New Denver to Nelson segment of the track is available here.

Next: Phase Three: Nelson to Omak (WA).